


Yesterday, I decided to try a completely different type of cake. This one needs no butter..... but an inordinate amount of cream. In fact, my daughter said it was diabetes overload, with the quantity of cream needed. I must admit, the amount was pretty staggering, but this is what gives the cake a beautiful light and fluffy texture.


You will need 3 x 8 inch cake tins. Pre-set the oven to 350F (170C).
Ingredients:
700ml (3 cups) heavy whipping cream.
6 x large eggs.
395g (1&3/4 cups) granulated sugar.
1tsp vanilla extract.
450g (4 cups) self-raising flour, sifted.
1tbsp & 1tsp baking powder.
1tsp salt.
Method:
Pour all of the cream into a bowl and whisk by hand. I know this can be a bit of a pain, as it takes a while to thicken, but what you don't want is for it to be claggy thick, which is what will happen with an electric whisk.... trust me (wink, wink).
Once the cream has thickened slightly, crack three of the eggs in the bowl and whisk ever so gently. Maybe only 15 seconds or so. Then add the other three eggs and repeat the same process. What you are trying to do is to not deflate the cream.
Then, a spoonful at a time, add the sugar. Again being careful not to over mix. Add the vanilla next.
In a separate bowl, sift the flour/baking powder and salt together. Repeat this process twice. This makes it easier for the mixture to incorporate the flour, as it is nice and fine.
Slowly, with a spatula, fold the flour a bit at a time into the mixture, until you cannot see any traces of flour.
Once you are happy with the cake mix, divide into three and spoon into the three lined baking tins.
Bake in the centre of the oven for 30-35 mins.
Check that the cakes are fully baked by inserting a cake tester and ensuring that it comes out clean, with no bits of cake on it.
Frosting:
500ml (2 & 1/4 cups) heavy cream.
180g Philadelphia cheese.
200g icing sugar.
2 tsp vanilla extract.
Place all ingredients into a bowl and with an electric whisk, mix together until thickened and combined.
That simple ;-)
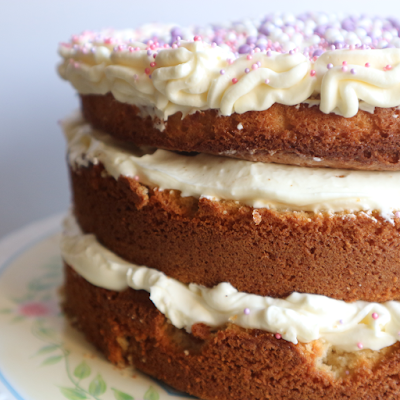
To assemble the cake, allow to cool in the tin for 10 mins and then turn out onto a flat surface. Layer the cakes with the frosting, reserving some for decoration.
I used a Wilton 1M tip to achieve the piped edging.
Decorate the three layered Vanilla White Cake, however you choose. Sprinkles, flowers or candles, if it's a birthday or special occasion.
Happy baking, everyone. Enjoy the long holiday weekend. Love, Sarah Xxx
1 comment
Today has been a somewhat quiet day and the weather hasn't helped either. It was the perfect day to roast a chicken. I don't know about anyone else, but when the weather is pants outside, I like to batten down the hatches and cook.
Pre-heat the oven to 200 degrees Celcius.
First, I wanted to add some flavour to the chicken. Sometimes chicken can taste a bit blah and bland. So, I raided the fridge and the cupboards and came up with a lemon, thyme and garlic combo. It was killer..... Totally what the chicken needed to be dressed with.

Here is a close up of the three amigos, just in case you didn't know what they looked like ;-)

I rubbed the chicken head to toe with butter, making sure I covered every surface. Next I sprinkled sea salt. This is good for crisping the skin. Carefully, I lay the lemon slices on top of the chicken along with a few sprigs of thyme.

Next, I stuffed the cavity with some lemon halves, garlic cloves and thyme. This helps to allow the smell to permeate the chicken and makes your kitchen smell divine.

Just artistically scatter the remaining ingredients around the chicken.
Pop it into the oven at 200 degrees Celsius for 90 minutes, turning it half way through cooking.
I decided to add some baby potatoes to the tin and allowed them to roast alongside the chicken.

After 90 minutes, remove the chicken and allow to rest for 15 minutes. This allows the juices of the chicken to settle back into place and make it all moist and juicy again.

In another tin, I roasted some sweet potato and more baby potatoes. These can be placed into the same oven as the chicken, on a lower shelf. They take 50 minutes to cook. Half way, give them a little shake in the tin, to move them around. This should allow them to brown evenly.

Yesterday was the perfect rainy day to make Halloween sugar cookies with the kids. They are tasty, colourful and great fun to make.
Ingredients:
3 cups of Plain Flour.
1 tsp of Baking Powder.
1cup of Stork Margarine.
1 cup of Caster Sugar.
1 large egg.
1 tsp of Vanilla Extract.
Colourful sprinkles.
Silver Spoon Icing Sugar.
8 tsp cold water.
Black fondant icing.
Americolor gels in Electric Orange & Violet - to colour tint the icing.

The Halloween Cookie cutters were purchased from Asda a couple of years ago, they have lasted for ages.

Method:
In a medium bowl sift the flour and baking power, put the bowl to one side for later.
In another bowl, cream together the Stork margarine and caster sugar with a wooden spoon until light and fluffy. Alternatively, to save time, you could use an electric mixer. I personally like the old school method, as it feels more traditional.
Next, add one large egg and the vanilla extract. Stir carefully.
Carefully and slowly, blend in the flour mixture, until fully incorporated. You should do this gradually, until the mixture starts to pull away from the side of the bowl.
Then, once the mixture looks like it could be handled, take the dough out of the bowl and place into greeceproof paper.
Knead the dough gently for a few minutes and then wrap in cling film. Chill in the fridge for 2 hours. If you are pushed for time, you could place the dough in the freezer for 20 mins..... But don't forget about it ;-)

Pre-heat the oven to 180 degrees Celsius .
Place the chilled dough on greeceproof paper and with a rolling pin, roll the dough until it is about a third inch thick.
With the cookie cutter shapes, press into the dough firmly and gently lift, until the shape is clearly defined. Remove the excess dough around the shape.
I find it easier to cut out the greeceproof paper around the shape and lift that onto the baking tray, rather than trying to lift the raw cookie, as it usually has a tendency to break.
Bake in the oven for 8-10 mins, until lightly golden.

Once the cookies have baked and are looking good, allow to cool whilst you prepare the icing.

In a bowl mix the icing sugar and water together. Add the water a tsp at a time, mixing thoroughly. You should stop when the icing leaves a small trail, when you cut through with a spoon, for 20 seconds.
Divide the icing into 3 separate bowls.

With a toothpick, a drop at a time, add the colour gel carefully. First the electric orange. Mixing well.
Then, in the other bowl, with another toothpick, the violet.
Keep one bowl with just plain white icing.

Now, you are free to decorate the cookies however you wish ;-)

Get into the spirit of Halloween and have no fear whilst decorating. Use sprinkles, ribbon, sweets..... Have fun!!

XOXO.
Subscribe to:
Posts (Atom)